April 7, 2001
Why Homebrewers Should Learn Silver Brazing.
Why not consider silver brazing when fabrication stainless steel and or copper brewing equipment? The process is simple to learn. The skill level is quickly achieved. Dissimilar metals, (copper to stainless) can be joined together as easily as similar metals, (stainless to stainless or copper to copper). The strength of the joint is tremendous; often the yield strength of the joint is close to the base metal strength. No grinding or polishing of the brazed joint is required, only that the flux and some oxidation need to be cleaned away before the part is put into service. There is minimal equipment to purchase. And the “ I done it myself ” factor will stay with you for years to come!
Words you might need to know, Glossary
Alloy, Degree of mixture with a base
metal.
Base Metal, The
metal to be joined.
BFM, brazing
filler metal. The silver-containing
alloy rod you will use to join the two base metals together.
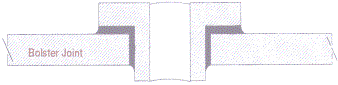
Bolster, A support or fixture.
Capillary Action or Attraction, The force that causes a liquid BFM to
be drawn between the faying surfaces of the joint, at brazing temperature, in any direction..
Faying Surfaces, The surfaces of interest here are the
surfaces inside the joint that are to be joined together..
Fixturing, Holding the two base metals together
during the brazing process..
Flux, A chemical applied to the surfaces of
the joint to clean and also to shield the oxygen and prevent the formation of
oxides at brazing temperature..
Wet, If BFM and base metal are compatible
(able to alloy with each other) then the BFM will “wet,” spread out along the
surface of the base metal..
The Process:
Silver brazing uses a silver-containing alloy with a melting temperature above 840ºF but below the melting point of the metals to be joined.
In brazing, the base metals are not melted. Only the brazing filler metal, BFM, becomes liquid and is drawn by capillary attraction between the faying surfaces of the un-melted base metals. The BFM is alloyed to these surfaces, creating a strong permanent and corrosion resistant joint. And, because capillary attraction defies gravity, the joint being brazed can be at any angle.
Principals of brazing:
There are a number of issues to consider before, during and after the brazing process that are so important to good brazing joinery that they are expressed her as principles. Most problems associated with brazing are the result of violating one or more of these principles.
1)
Good fit and clearance
2)
Clean base metals
3)
Proper fixturing
4)
Proper fluxing
5)
Correct brazing filler material
6)
Heating the assembly
7)
Cleaning the brazed assembly
Understand these principles and problem solving becomes a simple matter of the process of elimination.
Good fit and
clearance:
When designing joint fit you must keep in mind that the whole process of brazing relies on capillary attraction to distribute the brazing filler metal, BFM, throughout the joint interface. That joint clearance has a profound impact on joint strength. And that capillary attraction is most effective at clearances of between 0.001” and 0.005”. So to us homebrewers with the desire to build the perfect brewing system how do we recognize these tolerances when we see them. Here is some help.
For the ordinary homebrewer a smooth slip fit on tubular or bolster joints would give you an adequate brazed joint. The joint would have good appearance, resist stress and shock loads and would not leak under normal brewing situations (heat and pressure).
When brazing a tubular or bolster joint keep in mind that the joint clearance that you are trying to achieve happens at brazing temperature, not at ambient temperature. Therefore, consider the expansion rates of the two members being joined. If the two members are dissimilar, such as copper and stainless steel, then if copper is the inner member more clearance will have to be given the joint. If copper is the outer member then less clearance (a snug fit) will have to be given the joint.
A lap joint only requires that the two faying surfaces rest one on top of the other. Even highly polished stainless steel will have enough joint clearance in this configuration that when flux is applied, will allow the capillary attraction to draw the molten brazing filler metal across the entire joint.
Fortunately the least common joint that you will be making is the most frustrating one to get right. The butt joints, due to their small surface area, must be handled as carefully as possible. The faying surfaces must be smooth and free of burs, the edges must be square and the joint must be correctly positioned to give the most brazing area possible. Therefore fixturing is a must. Try to design out this type of joint if possible but if it is required then with a little care you will be able to obtain a strong joint.
Cleaning Base Metals:
Because the brazing filler metal needs to alloy with the base metals there must not be any interfering layer of material lying between them.
BFM will not flow over oils, greases or oxidation. This all needs to be cleaned away.
Start with a degreaser. Once all greases and oils are cleaned the surfaces must then be oxidation free. Acid etching, sanding or grinding needs to be done to ensure that all oxidation is removed.
Now that your parts are thoroughly cleaned it is important to minimize their handling.
Proper Fixturing:
Your imagination and a little ingenuity will go a long way in fixturing parts for brazing. Gravity works best if the parts have a good fit and will stay in place for the process. Additional weight can also help hold the part in place.
Self-support is not always the solution. A brazing support fixture may be needed. Design this fixture with as little contact area between the assembly and the fixture as possible. A fixture with a large contact area will conduct too much heat away from the assembly. And make sure that you allow room between the joint and the fixture so that the flame can reach and heat the joint.
The best way is to design the part to be self-fixture during the brazing operation.
Proper Fluxing:
Brazing filler metal need a clean oxidation free surface to wet and alloy to. Base metal heated to brazing temperature will under go a chemical reaction between the hot metal surface and oxygen in the air to form oxidation. One of the jobs of flux is to shield the surface of the metal from air, preventing oxidation formation. The flux will also dissolve and absorb any oxidation that was not completely cleaned off during the cleaning process.
The flux you will be getting will be in a paste form. The most convenient way to flux your parts will be to brush the flux on the joint. Do this just before you are ready to braze the joint. This will eliminate any possibilities of contamination. And because flux is corrosive there is the possibility that your part will become damaged from prolonged contact with the flux.
Another job of flux is to indicate the temperature of the base metals. White low-temperature silver brazing flux becomes completely clear and active at 1100ºF. At this temperature the bright metal surface underneath the flux is revealed. This is your indication that the base metals are just about hot enough to melt the BFM. If you are brazing dissimilar metals keep a watchful eye on the flux. If the flux becomes clear on both metals at the same time you know that you are heating the parts evenly.
When you step up to the counter of your local welding supply shop you will find that there are a lot of fluxes available for a lot of brazing applications. If you don’t want to look too stupid, just ask for white brazing flux. That will be a good flux for most ferrous and non-ferrous metals, the type of materials homebrewer's work with.
Save yourself the frustration of trying to get the exact flux for a particular job. Production brazing would benefit from zeroing in on the flux but for a homebrewer to do that would mean he would have to have a few different fluxes stored around the shop for years. It’s best to settle for one universal flux and learn how to work with it. Then as needed buy one small fresh bottle of flux.
There is a warning label on the flux bottle. Something to do with containing Fluorides. So read that label. It’s not serious but there is some do’s and don’ts to protect your health such as don’t breathe the fumes and avoid skin contact.
Correct Brazing Filler Material:
Again, like flux, there is a multitude of filler metals to choose from. But make your life simple. Safety-Silv 56 is a good filler metal choice for doing what your going to do, join stainless steel to stainless steel, copper to stainless steel and repair the kids sidewalk scooter. This BFM is cadmium-free 56% silver brazing alloy. Get 1/16” (1.6mm) or smaller. And of course buy the smallest amount you can get. BFM goes a long way, a very long way. That’s what makes silver brazing so economical. As in the Brillcream commercial… “a little dab’ll do ya!”.
Heating The Assembly:
Here is where your skill as a craftsman comes into play. This step brazes the joint. It involves heating the joint to brazing temperature and flowing the filler metal through the joint. Both members of the joint must be heated evenly to prevent a cold joint. Thick metals will heat more slowly than thin metals. So when joining thick metals to thin metals more heat must be applied to the thick metals so that they both reach brazing temperature at the same time. Copper absorbs heat faster than stainless steel. So when joining copper to stainless steel more heat will have to be applied to the copper member. The flux is your clue. Watch the flux change appearance. If it changes evenly then you are heating both members evenly.
When both members of the joint reach brazing temperature (the flux will have turned clear) hold the BFM carefully against the joint and allow the base metals to melt off a portion of the filler rod. Care should be taken not to direct the heat at the filler metal but rather on the opposite side of the joint, allowing the heat of the base metal to melt the brazing filler metal. The BFM will instantly be drawn by capillary attraction throughout the entire joint. Molten filler material tends to move in the direction of the heat so heating the opposite side of the joint from the BFM will aid in spreading the filler metals through the joint.
My experience with joining a bolster to thin 16 gauge stainless steel is that heating the opposite side of the joint from the filler metal does not provide the best results. This method, although works with heavier members, does not provide enough heat to melt the brazing filler metal and thus start the capillary attraction that will draw the metal around the entire joint. Heat the entire joint to brazing temperature (flux has turned clear on both members) carefully position the BFM in the joint about ¾” behind the flame. A small portion of the filler metal will melt off and travel most of the way around the joint in both directions. Advance the flame around the joint until you meat the filler metal on the other side. As you advance the flame the filler metal will follow the heat and will join up with the filler metal on the other side.
Lap joints braze best if you heat the entire joint to brazing temperature then direct the heat under the joint while applying the BFM to the joint on top. Remember that thin base metals such as 16 gauge or thinner will not heat evenly over a large area so you will have to play with the heat to ensure the joint maintains brazing temperature throughout the entire joint.
But joints usually are long joints as compared to the cross section of the base metals. Heating the entire joint evenly to brazing temperature will be near impossible with a torch. You will have to heat as you go. With good fixturing to prevent warping, pre-heat as much of the joint as you can then start about 1” from the edge and re-heat this area to brazing temperature. Carefully apply the BFM to the joint. Instantly a small amount of filler metal will melt off and capillary across a portion of the joint that is at brazing temperature. Advance the heat across the joint and watch the molten filler material follow the heat till it won’t go any further. Then apply the filler metal to the hot joint again to replenish the stream of molten filler metal. Continue this process until you have traveled across the entire joint.
Conclusion:
One thing that makes silver brazing appealing to the average homebrewer is that you need no special equipment. Most people have a propane torch. That’s all that’s needed. An oxygen/acetylene torch would be mice but not required for light silver brazing. You can purchase your low temperature flux and silver containing brazing metal from any local welding supply store. The cost is virtually nothing considering how far the filler material will go.
When you have mastered this technique of joinery you will be able to produce strong, tight, corrosion resistant good looking joints with ease. Making good brewing equipment is just one of the many responsibilities you took upon yourself when you decided to become a homebrewer and silver brazing is one way to do it with a professional look.
Learn it and enjoy it!
Bob
Hoaglan
For further
reading I suggest you go to the American Welding Society page and read W.
Daniel Kay’s article on silver brazing.
 |
When applying heat to a bolster joint, apply heat evenly to brazing temperature. Then apply heat 3/4" ahead of the BFM and advance around the bolster. |
| Chamfered edges of a butt joint will weaken the joint. | |
| Joint gap must be maintained between 0.001 " and 0.005" for capillary attraction to draw the BFM across the joint. | |
| Properly positioned butt joint. Capillary attraction will draw the BFM across the joint. | |
 |
Incorrectly positioned lap joint. Joint spacing tolerance violated and reduced the capillary attraction. BFM was not drawn across the entire joint. |
| Correctly positioned lap joint. Capillary attraction is able to draw the BFM across the entire joint. | |
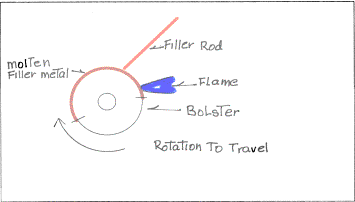 |
To the right is a bolster joint heated to brazing temperature. The position of the BFM as it touches the joint. Molten filler material as it capillaries partially around the joint. The position of the flame and the direction of travel of the flame to complete the brazing operation. |